(1) Hammond Consoles with Two Power Switches
[BV, B2, B3, CV, C2, C3, D, RT2, RT3, D100, A100, etc]

There are three places to oil in these models. Looking in the back on the left is a “tub” located on the Motor/Scanner assembly. You will notice a felt inside this tub connected to strings going to the bearings. This felt should be moist with oil. There is no reason to fill this tub. In fact, over filling it can cause oil to go into the Vibrato Scanner and cause Vibrato problems. Only make the felt moist here.
Secondly there are two filler funnels on the Tone Generator, one near the middle of the organ and the other on the right side usually behind some wires. On older models they will be brass while newer models will be white plastic. These should be filled twice each. Remember when filling them they are only funnels so they won’t stay full.
Now many of these consoles have an additional pair of oil cups that are located higher up and in the middle of the Organ. If you have this system then you would only oil there as they direct oil to the previously mentioned places. The left cup goes to the Motor/Scanner “tub”. Only fill it if the felt in the tub isn’t moist. Also only fill it half way. The right cup fills the Generator and goes to both locations on the Generator. Fill it to the top. Again these are funnels and they don’t stay filled. It will run down, some faster than others.
(2) Hammond Consoles with One Switch
[E100, H100, R100, etc]
The only difference here is the Run Motor. It will have two very small cups on each end of the Motor. The cups will have little spring loaded caps covering them. Here you will put drops of oil into the cups until they are filled. The Generator is as above.
(3) Hammond Spinets with Two Switches.
[M, M2, M3, M100 etc]
These organs have an extra cover over the Motor/Generator assembly and you have three cups on the cover. The left most cup oils the Motor/Scanner assembly and should be filled only halfway to prevent over oiling. The next two cups oil the Generator and should be filled 3/4’s full.
(4) Hammond Spinets with One Switch.
[L100, T100, T200, T300 etc]
These organs have the two regular filler cups on the Generator like category 1 and the two very small cups with the spring loaded caps on the Motor like category 2.
These instructions are for normal annual oiling and for normal usage. If the Organ has not been oiled regularly or it’s been more than a year since its last oiling then you should put additional oil in to catch up. Just don’t over oil the Motor/Scanner Tub on the left on two switch models. Also if the organ sees a lot of use, then a little additional oil is OK or more frequent oiling. I usually judge by the moistness of the Tub felt and the moistness of the felt just above the motor driven shaft going into the left side of the generator.
Contact Us for additional information or to have us come out and service your instrument.
(5) Stuck Generators
The tone generator can get complete stuck if not used or oiled a long time. This results in no sound.
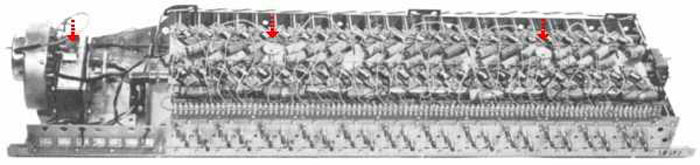
Generators with two motors, start and run.
First, the start motor needs to spin when the start switch is turned on and it should plunge into the generator so it can engage the gears. A quick test is to put your finger on the start motor shaft (right/bass end) and push it in. It should easily move in and out. If it doesn’t, oil both bearings and force it in. Usually, once it moves, it will be free.
Next, there is the run motor and shaft on the left or treble end. With your hand, try to turn the shaft. It should turn freely and even continue to spin on its own after you let go for a brief moment.
If it doesn’t, determine if its because of the motor or generator. The motor has a “flywheel” next to it. See if it turns at all. There is enough play in the shaft so that the motor and generator can turn independantly a slight amount. If the wheel seems stuck, see if it will slide from side to side. Normally, there is a fair amount of left to right sliding. If it doesn’t, you can free it up quicker by forcing it to slide. First, oil the shaft between the motor and wheel with a pocket oiler. That’s the only bearing you can get to without taking the motor out and separating the scanner from it. I usually take a medium size flathead screwdriver and place it between the motor and flywheel. Then, gently pry the wheel to the right, away from the motor. Then, try to force it back. After a few times of sliding it back and forth, it should free up. Watch carefully for the oiling string that goes from the oiling tub to the shaft and bearing. Do not break this string while you work on the motor.
Once the run motor is free, check the generator itself. Again, you should be able to spin it manually by hand and it should keep spinning on its own momentum. If it doesn’t, you will have to turn it by hand until it begins to free up. Remember, any oil you put in the top funnels will take a week or more to get to all the bearings. Assuming you have oiled it well, continue with the manual turning. You should notice it getting easier after awhile. Keep trying the start motor to see if it helps or even takes off on its own.
Once the generator starts, you may notice a squealing sound. This is from dry bearings on the inner shaft and tone wheel bearings. To expedite this job, you can lift up the generator so that you can see under it. You may have to loosen some wires and harnesses but still be able to run it. With a can of WD-40, you can spray toward the noise. As soon as the spray hits the dry bearings, noise will stop. Continue this until all is running quitely. The WD-40 will not hurt anything in the generator and will evaporate soon enough. Hopefully by then, the oil from the top has found its way to the bearings.
Once running, check all tones by pulling out one drawbar at a time and playing all the keys on one of the manuals. This will confirm all generator tonewheels are spinning. It’s possible for tonewheels to be stuck even though the generator is running. There are springs acting like clutches that allow this. However, running it with stuck wheels causes wear to the drive gear on the stuck wheels. If allowed to run long enough it can damage this drive gear causing the tones to flutter or not sound steady in pitch. This problem is mostly not repairable so best to avoid it. Make sure all wheels are turning or fix the problem.
Remember, patience.
(6) Generators with one motor, Blue high torque motor.
This motor doesn’t have the “flywheel” but connects to the generator shaft with a coupling spring. You can remove this spring to separate the motor from the generator. Free up the generator in the same fashion as above. The run motor should run up very quickly. If it doesn’t, either the motor has problems or more likely, the run capacitor is faulty. A faulty run capacitor will cause the motor to be weak and run erratically. Often, the capacitor will even look like it’s bulging out at the top and sides. If you find this, replace it right away. The motor should be removed, disassembled, cleaned and lubricated. Once it’s reinstalled, you can put some drops of oil on each end in the oiling caps.


1 thought on “Oiling Instructions for the Hammond Organ”
We could only find the 2 funnels to oil but not the 3rd. It has two switches and motor runs but does not make any music. It had not been oiled and started to squeal. Do we just wait or did we miss something?
Comments are closed.