Make sure the threads are in place going to each bearing.
From the oiling “tub” there are threads that go to each motor bearing. These threads provide the motor bearings with oil. There should be enough oil in the “tub” to make the felt moist which will supply the bearings via the threads with oil.

Make sure the motor spins freely.
To check the motor separate from the generator you must remove two springs that couple the motor to the generator. Once removed, you may spin the motor or generator independently.
If the motor is stuck, apply oil directly to the bearings and turn it by hand until it becomes free. You can also help free it up by pushing the shaft in and out.
You may have to remove the vibrato scanner to access the rear bearing but a carefully placed drop of oil can be directed to that bearing. Also soak the threads.
It should be free enough to spin so that it will gradually slow down and not stop immediately.
Checking the two coils in the run motor.
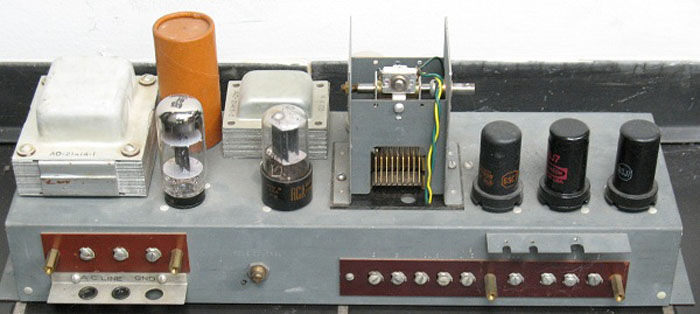
There are two field coils with four wires, two red and two black. Each pair of red/black wires go to one coil. It is possible for a coil to fail causing the motor to lose it’s normal power. In some cases it may still run but be very unpredictable.

Looking at the above panel where all the wires connect, you will see that the forth terminal from the left connects to two of the run motor wires. Also notice that this terminal is connected to the line source.
The other pair of motor wires are connected to the seventh from the left or the right most terminal.
Now each motor winding has approximately 180 ohms of resistance. This means that the two fields in parallel would read 90 ohms. So if you measure the two terminals which connect to the run motor you should read 90 ohms if both coils are OK. If you read 180 ohms, then one field coil is open. If you read infinity, then both coils are open. Replace the motor.
All 60 cycle run motors are the same and you can use one from say an M series spinet organ or equivalent.


4 thoughts on “Hammond Synchronous Run Motor”
Is it possible to buy the special mounting bolts that go through the sync motor housing and also function as the mounting bolts to the generator frame ! Mine are stripped where they mount to the L mounting brackets . Thank you for your info above. It is very helpful.
I don’t know. Never had to disassemble a sync motor. As long as any new bolt is the same length and diameter, it should work. Hammond used pretty standard gauges back in the day.
Hey, nice info you got on this site. Are you aware of any sort of system overview diagram or something like that of one of the most used Hammond models?
I have read a lot of bits and pieces all over the net, but have no confidence the overall image my head created from that is anywhere near accurate.
I find it especially interesting what all those spring couplings do and the effects of that interesting type of motor. It seems to make the sound generation, in the fine details, a lot more complex than I was aware of.
i need help in accessing the run motor on my cv. Is there instructions somewhere to remove or lift the top manual to get access to it. thanks
Comments are closed.